

Here's our guide on how to delete everything in your MacBook from the latest, Cheyenne, to any previous OS
Is your company planning an upgrade to its computer devices? If this includes replacing MacBook or other Mac computers critical to your company’s operations, make sure the process outlines a step to clean up old computers. With the amount of personal and essential data that each MacBook houses, failing to remove all data before selling or disposing of your old devices could leave your company vulnerable to severe data breaches.
For your own security, it is important to properly remove all data from your old MacBook by reformatting your hard drive and reinstalling a clean version of the operating system. If you’re unsure of how to do this for your computers, here's how to delete everything in your MacBook.
This guide covers legacy systems as well as the new Monterey OS.
| Difficulty: | Easy, requires clicking on prompts, some button presses (with macOS Monterey, it's a four clicks total process) |
| Duration: | Monterey and newer OS: averages 1-5 hours Legacy: potential for 8-15 hours (highly dependent on the number of files and age of your MacBook) |
| Who can do it? | School administration, those with MacBooks, IT professionals |
| Wiping data in bulk: | Should leave this task to a professional service |
Here's how to delete everything in your MacBook:
Step 1, Backup, Backup, Backup!
Before anything, use iCloud or an external hard drive to store any files you want to keep from your computer’s hard drive. It is important to make sure you have the most up-to-date backup of your important files and data. To learn how to backup your data in macOS in iCloud or Time Machine, click here.
Step 2, Sign out of All Accounts
Sign out of iTunes Account
- Open iTunes.
- Go to Account > Authorizations.
- Click Deauthorize This Computer.
Sign out of iCloud
- Choose Apple Menu > System Preferences > Apple ID.
- Find iCloud in the side panel and click Turn off Find My Mac.
- Select Overview in the side panel.
- Click Sign Out.
Note: A dialog will ask if you want to keep a copy of your iCloud data on the Mac. Since you’ll be reformatting your hard drive in the next few steps, click Keep a Copy.

Sign out of iMessage
- Go to Preferences > Accounts.
- Click Sign Out.
Sign out of Other Licensed Programs
Some programs like Microsoft Office or Adobe Creative Suite are licensed to a specific computer. It’s best to sign out of these programs on an old device so there is no confusion when you try and activate the new one.
Step 3, Turn Off FileVault
FileVault is Apple software to encrypt your files and keep them safer. If you disable the encryption prior to deleting all of your files, the process should go a lot faster (as with anything in computing, there are no absolutes but 1's and 0's).
- Click on your Apple at the top left of your screen.
- Open System Preferences > Security & Privacy.
- Once in Security and Privacy, you'll see the second tab, FileVault. Click on that and then click the Lock button at the bottom left of the screen.
- You will need to enter the password of the administrator account (you'll need this for erasing your files, so have it with you) to unlock the FileVault settings.
- Finally, hit Turn Off FileVault... at the top right.
After FileVault is turned off, your files will no longer be encrypted.
Step 4, Are You Running Monterey OS
If you are unsure as to whether or not you are running the latest OS as of this publication, which is Monterey as of October 2021,
- Click on your Apple at the top left of your screen.
- Click on About This Mac.
You'll then see a screen like this.
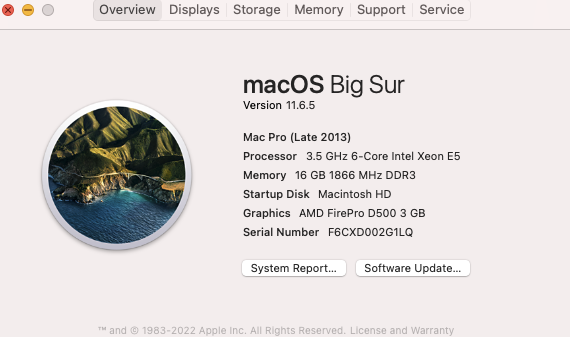
If you have this screen (Big Sur is indicated as the OS), then that means you'll have to go to Step 5, How to Factory Reset Old MacBook. If you have Monterey OS installed, the process will be much easier for you in Step 4 below.
Step 5, How to Factory Reset a Mac or MacBook (macOS Monterey)
- Click the Apple icon in the menu bar (the same icon as before to identify your OS).
- Select System Preferences from the drop-down menu.
- Now click on Erase All Contents and Settings.
- Enter the password associated with the account and select OK.
- Select Erase All Content & Settings.
Your Mac will restart itself several times. Be patient and just let it do its thing without closing your MacBook or disconnecting it from power (you really don't want to perform this operation relying only on battery power). Once it's completed, you'll see the familiar "Hello" screen.
Step 6, How to Factory Reset Old MacBook (Big Sur and previous OS)
If you have an OS like Big Sur, Catalina, High Sierra, etc., then you'll need to follow this approach.
After completing your backups and signing out of the different applications that could connect your old MacBook to any of your personal information, the next step is to erase and reformat your hard drive.
- Restart Your MacBook.
- While your MacBook wakes up, hold down Command +R keys simultaneously. This will send you to macOS Recover.
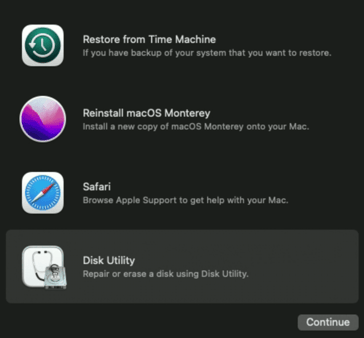
- Select Disk Utility.
- Click Continue.
- Select View.
- Click on Show All Devices.
- Choose your Startup disk (Usually named “Apple SSD”)
- Click on Erase.
- Type in a name for the file to be destroyed.
- For MacBooks that are using HFS+, select Mac OS Extended (Journaled) from the format list. For those using APFS, select APFS from the format list.
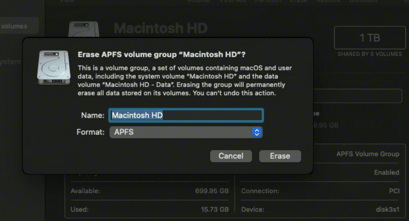
- Select GUID Partition Map if Scheme is available.
- Click Erase.
- Once the process is complete, click Quick Disk Utility from the Disk Utility drop-down menu.
Step 7, Reformat Hard Drive
- Restart Your MacBook.
- While your MacBook wakes up, once again hold down Command +R keys simultaneously. This will send you to macOS Recover.
- To reinstall the operating system your MacBook came with, click on Reinstall macOS.
- Click Continue.
- When the prompt to select your disk appears, select your hard drive.
- Click on Install to install the latest operating system on your MacBook. Expect your MacBook to restart once the installation finishes. Don’t close your MacBook during the reinstallation process, it will stop your MacBook from reinstalling. Your screen will go blank, show the restart Apple logo, and a progress bar will appear.
- Hold down Command and Q after your computer finishes reinstalling. Do not follow the setup instructions, if you’re selling your MacBook, the new owner will fill those out.
- Click Shut Down.
Once your MacBook shuts down, your data has been fully removed and is ready to be sold or disposed of! iMacs and other units with Mac OS installed follow similar instructions, but the name of your Startup Disk may vary.
When You Have to Wipe MacBooks in Bulk
It can be a time-consuming process to wipe each MacBook or iMacs individually in large quantities during a system refresh, but it’s still essential to keep your data safe with a secure removal. If you need to wipe Macs in bulk or want extra security measures to make your data not only inaccessible but destroyed, consider going to Greentec! We use certified methods to go one step further in wiping devices — ensuring that they end up as fresh as a brand-new computer. For businesses, this can be a crucial consideration for end-of-life disposal. We also not only deal in Mac disposal, but all sorts of devices.
Contact us for more information about how we can help your organization collect and store, recycle or dispose of electronic devices at end-of-life. Make sure to connect with us on Facebook, Twitter, Instagram and LinkedIn to learn more about our services and stay up to date with our mission.


